Friday, November 29, 2019

Friday FOs - 29.11.2019

I have had another productive week with four finished object to show off. Here they are in order of completion.

A Shopping Bag with Drawstring
Another bag for the Community Centre where I got the cotton.

Comfort Bear No. 49 for this year
There are now 4 weeks left of this year so I guess I can have a week off and still get 52 done for the year.

Two Green Sheep
Since I sold my last sheep a couple of weeks ago I thought I should make some more. The plan is to have two of every colour but my sister has asked for another green sheep so I will need to make another of these before I work on the other colours.

That's it from me for this week. Until next time, have a good one.

Richard.

Friday, November 22, 2019

Friday FOs - 22.11.2019

I had had another reasonably productive week with three finished objects to show you. Here they are in order of completion.

A Red String Bag with Pouch

The Bag in its Pouch
I have sold a few of these recently so you can expect to see a few more of these over the next few weeks.

Comfort Bear No. 48 for this year
One more bear for a child to hug.

A Brown Bear
The first of the animals that go with the book "Brown Bear, Brown Bear, What do You See?" I will be making all the animals for that book eventually but I also need to make some sheep because I have sold out of them. Which should I do first?

That's it from me for this week. Until next time, have a good one.

Richard.

Tuesday, November 19, 2019

How I make my Shopping Bags

I have been asked for a pattern for my shopping bags but I thought it would be better to just do a picture tutorial and show you how it is done.

I start by making a  disk.

The Starting Disk
The pattern for the disk is as follows.

ch 5, sl st to form a ring
ch 1, 12 sc into ring
ch 3 (counts as dc), dc into first sc, 2 dc into each sc around, sl st to join (24 stitches)
ch 4 (counts as dc, ch), dc + ch into each dc around, sl st into 3rd ch of starting ch (48)
ch 3, dc into next ch sp, dc into next dc, continue all the way around, sl st into starting ch. (48 dc)
ch 3, dc into each dc around, sl st into starting ch (48 dc)
ch 1, sc into same place as sl st, sc into each dc, sl st intp 1st sc (48 sc)

For bags with a pouch I make 2 disks.

Two disks that will form a pouch
I then join the two disks with scs making sure to leave a 12 stitch opening.

Two Disks Joined
I then work approximately 30 loops around by doing sc into 1st sc, ch 5, sk next sc, sc in next sc, ch 5, sc in next sc, until the last loop. The last loop is formed by doing ch 2, dc into 1st sc.

Single disk with first row of loops
Pouch with first round of loops
Continue each round with ch, sc into loop, ch 5, sc into next loop, finishing with ch 2, dc into 1st sc for a total of 30 rounds.


Bag with 30 rounds of loops
The finishing depends on whether I am making handles or a drawstring. If handles, I do 3 dc in each loop starting with ch 3, dc in 1st loop, finishing with 1 dc in the 1st loop, sl st into 3rd ch of starting ch. co. If drawstring, replace 1 dc in each loop with a ch.

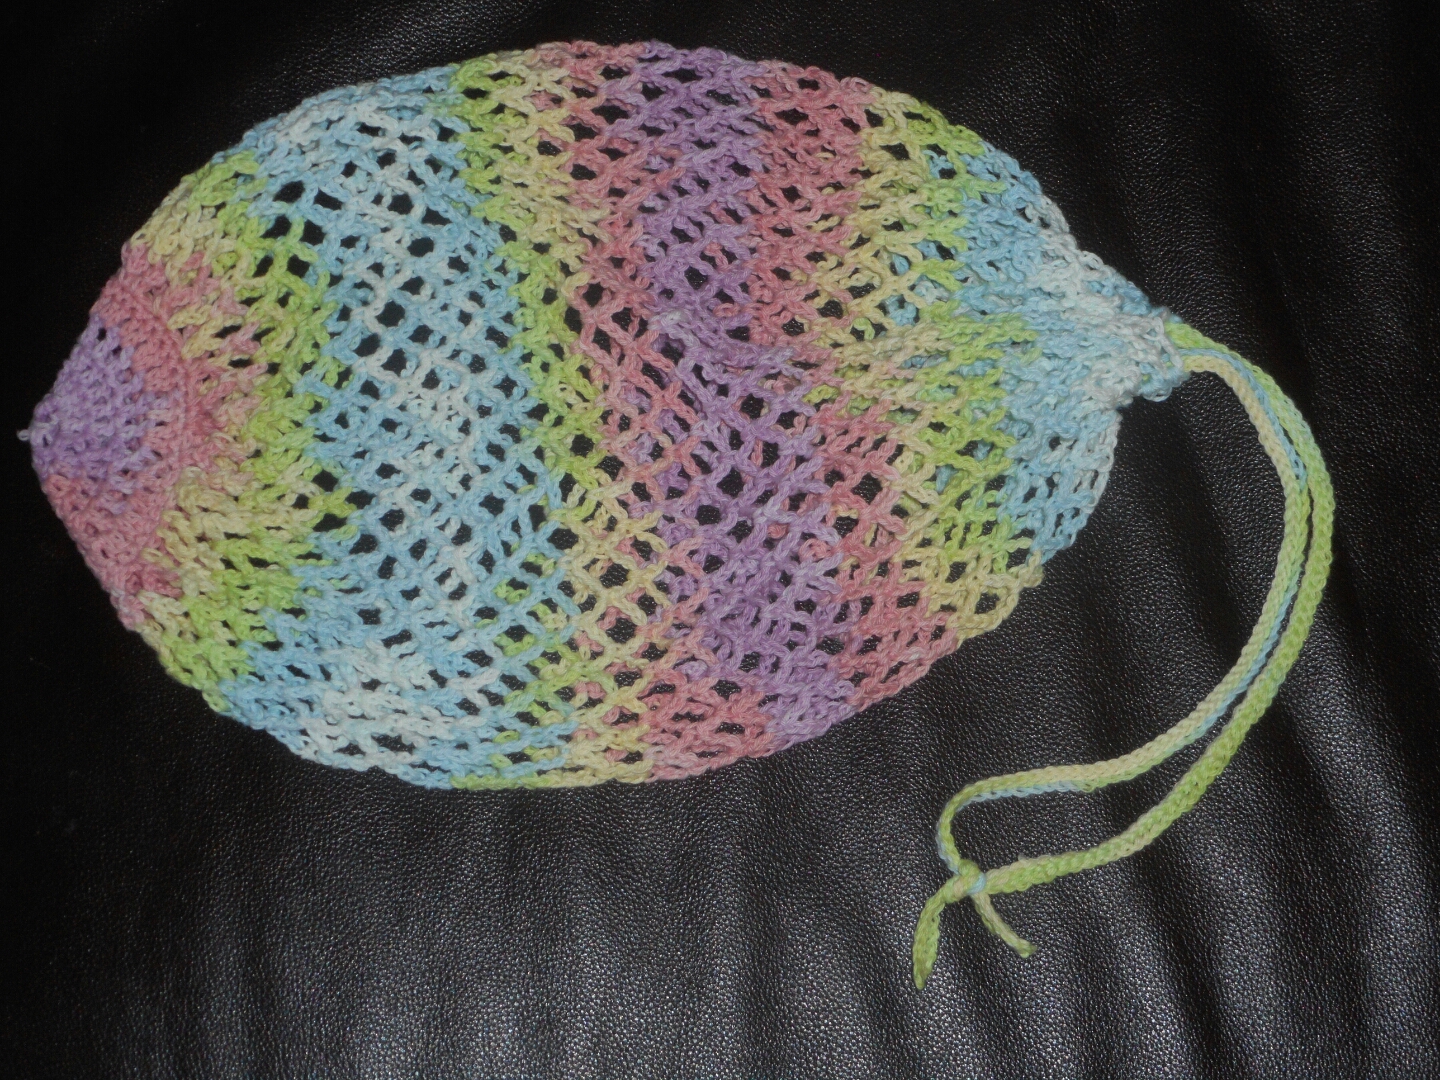
Bag read for drawstring
Drawstring for drawstring Bag
Finished Bag
To finish the bag with pouch I make a pair of handles and add a button and button hole to the pouch to hole the bag in the pouch.

Finished Bag with pouch and handles

Finished Bag in its pouch
I haven't described how I make the handles bcause I use a farely complex method that is hard to describe but I'm sure experienced crocheters cand figure out how to make handles.

Hope this helps you make your own bags.

Richard.

Friday, November 15, 2019

Friday FOs - 15.11.2019

I have managed to finish a few objects this week which makes it look like I have been very productive but I have been working on two of these for a few weeks. Here are my finished objects for this week.

Shopping Bag with Pouch
Shopping Bag in its Pouch
I was working on this last Saturday while at the Art & Craft Fair and sold it before it was even finished.

Pram Blanket
After consulting several size charts it seems that my previous blanket was too small for a pram and was suitable for a child's comforter. This one is somewhat larger.

Comfort Bear No. 47 for this year
Another Comfort Bear, ready for service.

That's all from me for this week. Until next time, have a good one.

Richard.

Friday, November 8, 2019

Friday FOs - 08.11.2019

I have been quite busy this week and have managed to finish three items, and here they are.

The first item that I finished this week was another string bag.

A Rainbow coloured String Bag with a drawstring clossure
The Rainbow coloured String Bag drawn closed
This is another made for the community centre where I volunteer.

The other two finished items came about because of a request from my paster. She wants to give three bears to officers that are leaving the area for other posts. Unfortunately, I pnly had one and she wanted them this week, so I needed to make two more, and here they are.

Comfort Bear No. 45 for this year
Comfort Bear No. 46 for this year
I made these in Salvation Army colours because I thought it would be appropriate for the people that they are going to be given to.

That's all I have for you this week. I am still working on the tutorial for how I make the string bags so expect to see that shortly (for some definition of "shortly"). Until next time, have a good one.

Richard.

Tuesday, November 5, 2019

How I Make My Comfort Bears

I have had several people ask me for a pattern for these, but I have never had one. I made my first bear after seeing a knitted version, worked out how to make it in crochet and made adjustments until I was happy with the final result.

The end product
I could have used better colours to show this but I hope you can see enough to be able to follow.

Because the tutorial for some of the stitches I use are only in US stitches I will be using US terminology for these instructions. Fro those that are used to English terminology, US sc = Eng dc.

I start with 20 foundation sc stitches but you couls start with 21 ch and 20 sc into the chain. Make sure to leave a long (10-15cm) tail at the start to help with sewing up the legs.

20 x fsc
I then continue with 1 sc in the base of each fsc (or unused part of ch st),

First round complete
I then continue with 1 sc in the front loop only of each sc for 19 rounds. Working in the front loop only makes the stitches stand up straighter than using both loops or back loop only.

The change of colour is acheived using a method that I learned online. It is called a jogless colour change. While this doesn't produce a jog free colour change, the jog is reduced significantly. It is achieved by starting the stitch with the first colour, completing it with the second and then a slip stitch into the next stitch.

The first 19 row with the first colour change
I then do 10 rounds with the second colour before changing to the third colour.

The front of the main body
Back of main body
As you can see, the jog is still visible.

Make sure to leave a long tail at the end for sewing up the ears and top.

To make the arms, start with colour 3, 2 ch, 6sc into the first ch, 2sc in each sc, 1 sc in each sc for 2 rounds, change to colour 2 and do 9 more rounds, leaving a long tail at the end. Make 2.

Body and arms
Using the tail left at the start, sew up the middle of the bottom section to separate the legs.

Body with leg stitching
Stuff the body and arms with appropriate material. With the body stuffed, using the end tail, sew across the top for 5 stitches, sew down at 45 deg toward side to create the first ear, continue sewing across the top to last 5 stitches, sew down at 45 deg toward other side to create the second ear, sew remaining stitches across top and hide the end.

Body stuffed with ears and top sewn up
Body complete, arms stuffed ready to be sewn on.
Sew on arms.

All ready for the facial features to be embroidered
 Finsh by embroidering the facial features.

The Finished item.
The dark colours make it difficult to see the facial features so here is last week's bear.

Last week's bear
I hope this helps those that want to make these.


Friday, November 1, 2019

Friday FOs - 01.11.2019

Another week has finished and I have finished another bear, and here it is.

Comfort Bear No. 44 for this year
I am still keeping up with my one bear per week.

That's it from me for this week. Until next time, have a good one.

Richard.